Friday, 23 January 2015

The Culture Night by Yuri Shumakov

I had the privilege to meet, fishing and tying flies with Yuri Shumakov in the late 1900's and early 2000's. Yuri was one of the most creative and passionate fly tier that I ever have met. All his flies, every detail on them was carefully thought through. Only the best materials were used and he himself took up a number of materials such an amazing goat hair, Serebrjanka, and a separate tube system that included the long-range tubes. He was as good at fishing for sea trout for rainbow trout and salmon in all types of water.
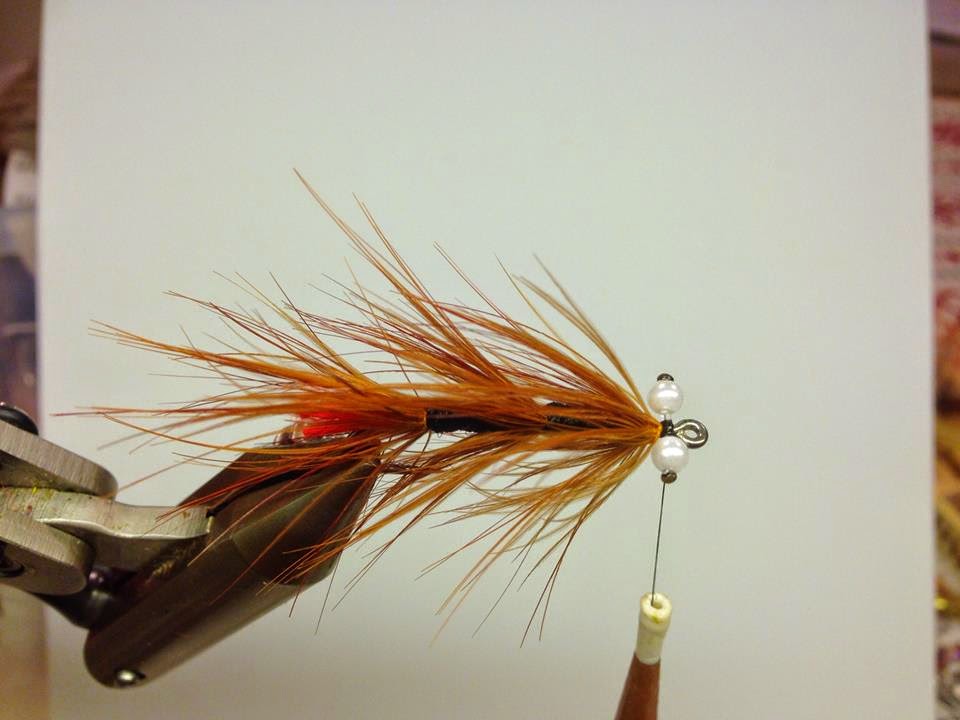
Culture Night is a pattern that he developed by opportunity. During the Cultural night, a night event in culture characters in Lund, the city that Yuri lived in, in southern Sweden. He found some black shiny wool yarn and the day after that the culture night overnight was born. An excellent fly for coastal trout were created. I tied lots of them and used them frequently with great success. Even rainbow trout and sea trout in rivers fell for it. The original was tied with big eyes of synthetic pearl beads but to get the weight in them I also tied different variations with chain eyes and dumbbell eyes.

Yuri died sadly to soon in the mid-2000s while fishing on the Kola Peninsula river.

Bob Kenley has written a very readable article on the website Rackelhanen about Yuri on http://www.rackelhanen.se/eng/10316.htm


Material
Hook: Mustad streamer Signature Saltwater S74SZ Size 6 or 8
Thread:  Black
Eye / Weight: Pearl beads or nickel/silver chain eyes or even dumbbell eyes if you want a sinkbomb.
Tail: Fluo orange or red wool yarn.
Body: Black wool yarn
Body hackle: 3 orange red golden pheasant body feather/hackle
Head:Black wool yarn
Flash: 2 strands of mirage flash


1. Start with attaching the thread on the middle of the hook shank 

2. Then take 2 or 3 (depending on how thick the woolyarn are) pieces of fluo orange or fluo red wool yarn and tie them in on top of the hook shank, like in the picture.

3. Now, take one of the body feathers /hackles from the golden pheasant and stroke the fibers down the steam of the feather wile holding the tip of the feather. You should now have the fibers of the feather tip separated so that you can tie it in where the tail starts. 

4. Take the feather steam with the hacklepliers and wind the feather forward in touching turns while you at the same time stroke the feather fiber backwards.
Attach the feather/hackle with the thread and cut of the accessed material. To get the sloping style of the hackle you may have to wind a couple of rounds with the thread around the base of the hackle while you stroke the fibers backwards.


5. Attach the black wool yarn

6.Wind the black wool yarn forward to the middle of the hook shank. Attach it and cut of the rest.
Repeat the steps in 4. for creating the middle boody hackle.

7. Attach a new strand of the black wool yarn 

8. Wind a frontboody. Attach and cut of the wool yarn. Its important that you leave about 3-4 mm mm free for the fronthackle and the head and the eyes.  

9. Tie in the fronthackle.

10. Attach the eyes. I varies the eyes depending if i want a flie that should sink faster, then i use the chaineyes or even dumbbell eyes. But mostly i prefer to fish this flie as light as possible, especially if i use it for fishing after seatrout from the coast. Don´t forget to secure the eyes with a drop of superglue.

11. Attach 2 strands of mirage flash. The length of them should exceed just behind the tail and the hackle.

12. Now we should finish the flie whit the head. Attach the black wool yarn just in fron of the fronthackle. Wind the thread in front of the eyes. 

13. Wind the woolyarn in figures of eight around the eyes. Attach it and cut of the woolyarn and then finish the flie with a couple of whip finish knots. Cut of and varnish.

You now have a rely good flies for chasing seatrout. 


Monday, 12 January 2015

HMG Baitfish

HMG (hot melt glue) Baitfish

One of my favourite flies for sea trout fishing on the coast. A very durable and sturdy fly that can handle many fishing trips and many hungry trout.
I tie them in a few different sizes and varies the sizes of the eye quite a lot and actually it so that the variants with really big eyes fishes the best.
The disadvantage of hot melt glue flies is that they are a bit sticky to tie and they are actually quite difficult to get perfect bodies on. The glue love to obstinate. But on the other hand, you get one of the most sustainable flies available and the fish do not care a damn about beauty. A hearty meal goes before beauty.


Material
Hook: Mustad streamer Signature Saltwater S74SZ Size 4 or 6
Thread:  Transparent mono thread
Eye: Dumbbell epoxy eyes or any epoxy Eyes that you prefer  
Tail: 10-12 Crystal Flash in desired colour. This one I have used light pink to.
Under Body + head: 2/3 Same as the tail and the 1/3 in the front will be left for the eyes/head.
Over body:  Hot melt glue
Body hackle:  Light blue dun hackle and of course you can use what ever colour  you like.


1. Attach the thread just behind the hook eye


2. Take 10-12 straw of crystal flash and wind them tight to the hook so that the will cover the hook for about 2/3.Cut them so that there will be a tail about 1/3 of  the length of the hook shank. 


3. Chose a hackle whit hacklefibers that are about 1,5 time the length between the hook point and the hook shaft  


4. Prepare the hackle by pulling off the bottom shoddy parts and then pull the hackle fibers on one side of the hackle.The left side if you keep the tip of the hackle up and the convex side (the hackle outside) against you.Cut the last of the tip so that only a few mm is left.


5. Attached the tip where the tail begins and wind the tying thread forward against the eyes


6.Then attach a pair of dumbbell  epoxy eyes. If you use ordinary epoxy eyes you can go to next moment.


7. As you can se so should the eyes be attached a few mm before the hook eye

8. When I'm using hot melt glue I usually make some flies ready to the step where the hmg comes in.  


9. And as you can se I varies the sizes on the eyes.


10. Now we have come to the tricky part, applying the coat of hot melting glue. This will take a little practice to master. It should be applied in the form of a carrot. Tapering towards the tail. Don't fill the gap between the eyes yet.


11. Now start to wrap the hackle forward through the glue so that the hackle stem sinks into the glue and segmenting the body. 
The hackle will now be firmly secured in the glue. When you arrive at your eyes, hold the hackle under tension so that it remain in the glue until the glue has set. It takes about 30 -60 sec.


It´s now you will continue with the eyes and head if you don´t use dumbbell epoxy Eyes. After the body and hackle been done continue with forming a head with the glue. Let the glue set for a couple of seconds then apply the eyes by gently pulling them into the glue. To form the head and adjusting the form put some saliva on a finger and carefully form it.  


12. Finish by filling up the space between the eyes and below them. Allow the glue to harden and the fly is finished.


Saturday, 3 January 2015

HMG Shrimp

HMG (Hot Melting Glue) Shrimp

Hot melt glue is a material that I use for a variety of flies. 
This pattern i's a pattern that i have fished with for more than 15 years when i'm fishing for sea trout on the coast. 
It's the fly that I have most trust in when it comes to deliver strikes and to catch fish with. 
The fly is alsoe one of the most sturdily pattern becourse of the choise of material.
Stainless steel hook, melt glue body and a hackle which is anchored in the hot melt glue gives you a fly that  that resist both salt water and the smal but sharp teeth of a seatrout.


Material
Hook: Mustad streamer Signature Saltwater S74SZ Size 4 or 6
Thread:  Transparent nylon thread
Eye / Weight: Silver chaineyes
Tail: 10-12 Crystal Flash in desired color. This one I have used light pink to.
Underbody + thorax: 2/3 Same as the tail and the 1/3 in the front, orange luminous, glow in the dark, flashabou.
Overbody:  Hot melt glue
Body hackle:  Light brown (sand) grizzle hackle


1. Attach the thread just behind the hookeye

2. Then attach a pair of chaineys 

3. Take 10-12 straw of crystal flash and wind them tight to the hook so that the will cover the body
Cut them so that there will be a tail about 1/3 of  the length of the hook shank. 

4. Prepare the hackle by pulling off the bottom shoddy parts and then pull the hackle fibers on one side of the hackel.
The left side if you keep the tip of the hackle up and the convex side (the hackle outside) against you.
Cut the last of the tip so that only a few mm is left.

5. Attache the tip where the tail begins and wind the tying thread forward against the eyes

6. Attach the luminous flashabou, 5-6 straw.

7. Wind a thorax.

8. Attach and cut of the flashabou. Secure the thread and cut it of.


9. Now we have come to the tricky part, applying the coat of hot melting glue.
This will take a little practice to master. It should be applied in the form of a carrot.
Tapering towards the tail.

10. The most common error to do is to apply too much hot melt glue.

11. Now start to wrap the hackle forward through the glue so that the hackle stem sinks into the glue and segmenting the body. 
The hackle will now be firmly secured in the glue.

12. When you arrive at your eyes, hold the hackle under tension so that it remain in the glue until the glue has set. It takes about 1 minute

13. Now you can cut of the hackle and the fly is finished 

Now you have a fly for fishing sea trout on the coast. It works just as well if you use the fly with a fly rod or with bombarda