Monday, 16 March 2015

Making Nobbler heads

Dog Nobbler and similar flies based on the concept of a lead head on the fly, painted in different colors with painted eyes on is a fly with attractiveness and weight. The weight gives the fly a jigging movement that is often irresistible for fish. Here is a short description of how you make your own Nobbler heads. 
Material

Hook: Any kind of  streamer, long shank or even standard wet hook. I prefer the curved nymph hook, mostly because it gets fancier flies with this type of hook. Size 6-10 

Lead: Super soft lead shot, size BB- No.1. I prefer no.1 lead shot but if you need realy heavy depth chargers you can even use size AAA. Be careful when you use them so that they don't hit you when you are throwing your fly cast. It will hurt 

Glue: Super glue
Paint: Black and yellow  water based paint. Humbrol have a wide scale of colors and it dries really fast.
Other: Pliers, brush, scissors that you not care about, a stick approximately 3 mm diameter and pointed on one end (i use a barbecue stick  made of bambu or a toothpick) and a wine cork 

 
1. Take a lead shot and open it up to about 90 degrees angle with the scissors. 

2. Take the hook and place a tiny drop of super glue just behind the hook eye.

3. Place the hook in the open lead shot and squeeze it together with the pliers.

4. I use to prepare a lot of lead heads before i start painting them.
A cork is good to place the hooks on for handling them for painting them later.  

5. Paint the lead heads with black paint and leave them to dry. 

6.Take the stick and dip the wider end in yellow paint and make a dot on each side of the lead shot.  

7. Leave the hooks to dry.. 

8. Now use the smaller end of the stick and make smaller black dots on the yellow dots. 

9. Leave to dry. 

10. After the paint have dried the hooks are ready for dressing.


Wednesday, 11 March 2015

Marabou streamer. Yellow orange with a twist


In the early spring fishing in still cold water and sometimes colored by spring rains and flushed out soil particles  a really colorful fly with vibrant and abundant motion can be the right medecin.

This is a fairly simple and highly functional pattern for this fishery.


Materials
Hook: 4x long streamer hook. Size 8 or 6
Thread: 10/0 black or monofilament (take what ever you prefer)
Body: Any kind of silver metallic dubbing as long as it is soft. I have used Hends dubbing. 
Wing: Yellow fluo and fluo orange marabou
Ben: Yellow / orange fluo sili legs
Eyes: Fluo orange chain eyes


1. Attach the tying thread. 

2. Dub the thread with silver metallic dubbing. This is a easy way of making a silver body without using silver tinsel. I do mean that this kind of bodies reflects more light than traditional silver tinsel bodies.

3. Wind the dubbed thread toward the hook eye in a nice taperd form. 

4. Attach a smal batch of fluo yellow marabou.

5. And on top of that another batch of fluo orange marabou. 


6. To get the little extra twist on this fly we tie in three pices of fluo orange / yellow sili legs and finally, finish with chain eyes in the sharpest fluo orange color as possible.


7. Add a drop of superglue after you finished the flie.

Now you are ready to take a fight with the spring rainbow trout


Tuesday, 10 March 2015

Mysis shrimp

Mysis shrimp is an accessible prey for sea trout. They are small but are plentiful and are an easy prey. Small slim and transperanta flies with a shrimp-like appearance can often be very effective. This is a fairly simple pattern that has given me many sea trout over the years.


Materials
Hook: TMC 200 R or any other curved nymph hook. Size 8-10
Thread: transperant monofilament
Tail, underbody and thorax: Lite Brite dubbing. Yellow.
Body: a thin layer transperant plastic from a zip bag, 2-3 mm wide, or equally and round transperant nymph body  with a diameter of 0.5mm for small mysis and 0.8mm for larger flies.
Thorax cover A 3-4 mm wide strip of zip bag or equally
Eyes: Burned 0.50 to 0.60 mm monofilament and then painted black with permanent marker pen
Legs : 3-4 pieces about 0.25 mm monofilament


1. Attach the tying thread on the middle of the hook


2. Then take a few rays of yellow Lite Brite dubbing. The yellow Lite Brite has almost a yellowolive color. Attached them so they cover the hook up to a third of the hook shank and pointing back over the hook like a tail.


3. Take a plastic bag type a zip bag with a little thicker plas,ict. Cut a 3-4 mm wide strip tapered towards one of the ends.  


4. Cut the Lite Brite fibers to an an approximately 5 mm long tail. Also cut the remaining dubbing after about 2/3 of the hook shank.
Then attach the round nymph body at the beginning of the tail and on top of it the plastic strip. Keep in mind that nymph body must cover 2/3 of the the hook shank as well.


5. Start Winding the plastic strip over the dubbing. Attatch and cut of the remaning part of the plastic strip. Keep rest of the strip to use for the thorax cover.


6. Then follow after with the nymph body. Attatch andcut of the rest of  the nymph body.  


7. Attach the plastic strip again.


8. Now. Start preparing the making of the eyes.
Take about 4 cm 0.50 to 0.60 mm monofilament. Clamp the monofilaments in a hackelplier or in a tweezers. Burn the ends to form smal balls of melted mono.
9. Let them harden and color them later with black permanent marker


10. Attach the Eyes just behind the hook Eye


11. Take 3-5 pieces 0.20-0.25 mm monofilament about 6 inches long. Attached them on the underside of the hook in the middle of the front 1/3 part of the hook shank.
I prefer to do this with fly up side down.


12. Dub the thread with Lite Brite


13. And then dub the thorax


14. Fold the plastic strip over the thorax. And cut of the remaning part.


15. Finish the fly whit a whip finish and secure the ending with a smal dropp of superglue.


16. Turn the fly upp side down again and cut of the monofilament legs so that they will be about 5-7 mm long.


17. The Mysis shrimp is now ready and clear to go......


Friday, 23 January 2015

The Culture Night by Yuri Shumakov

I had the privilege to meet, fishing and tying flies with Yuri Shumakov in the late 1900's and early 2000's. Yuri was one of the most creative and passionate fly tier that I ever have met. All his flies, every detail on them was carefully thought through. Only the best materials were used and he himself took up a number of materials such an amazing goat hair, Serebrjanka, and a separate tube system that included the long-range tubes. He was as good at fishing for sea trout for rainbow trout and salmon in all types of water.
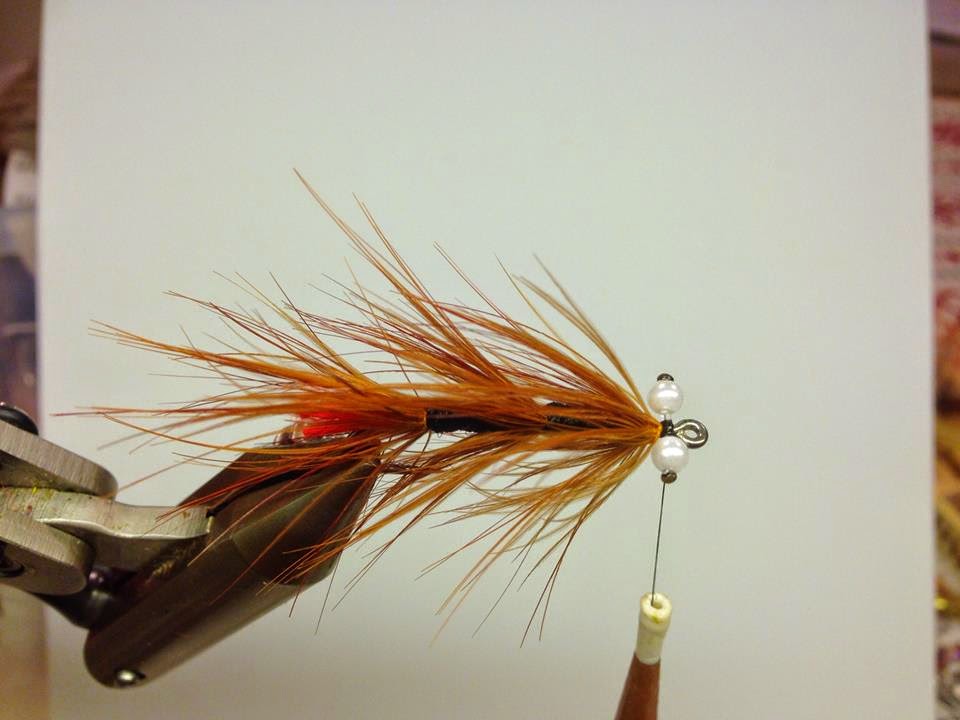
Culture Night is a pattern that he developed by opportunity. During the Cultural night, a night event in culture characters in Lund, the city that Yuri lived in, in southern Sweden. He found some black shiny wool yarn and the day after that the culture night overnight was born. An excellent fly for coastal trout were created. I tied lots of them and used them frequently with great success. Even rainbow trout and sea trout in rivers fell for it. The original was tied with big eyes of synthetic pearl beads but to get the weight in them I also tied different variations with chain eyes and dumbbell eyes.

Yuri died sadly to soon in the mid-2000s while fishing on the Kola Peninsula river.

Bob Kenley has written a very readable article on the website Rackelhanen about Yuri on http://www.rackelhanen.se/eng/10316.htm


Material
Hook: Mustad streamer Signature Saltwater S74SZ Size 6 or 8
Thread:  Black
Eye / Weight: Pearl beads or nickel/silver chain eyes or even dumbbell eyes if you want a sinkbomb.
Tail: Fluo orange or red wool yarn.
Body: Black wool yarn
Body hackle: 3 orange red golden pheasant body feather/hackle
Head:Black wool yarn
Flash: 2 strands of mirage flash


1. Start with attaching the thread on the middle of the hook shank 

2. Then take 2 or 3 (depending on how thick the woolyarn are) pieces of fluo orange or fluo red wool yarn and tie them in on top of the hook shank, like in the picture.

3. Now, take one of the body feathers /hackles from the golden pheasant and stroke the fibers down the steam of the feather wile holding the tip of the feather. You should now have the fibers of the feather tip separated so that you can tie it in where the tail starts. 

4. Take the feather steam with the hacklepliers and wind the feather forward in touching turns while you at the same time stroke the feather fiber backwards.
Attach the feather/hackle with the thread and cut of the accessed material. To get the sloping style of the hackle you may have to wind a couple of rounds with the thread around the base of the hackle while you stroke the fibers backwards.


5. Attach the black wool yarn

6.Wind the black wool yarn forward to the middle of the hook shank. Attach it and cut of the rest.
Repeat the steps in 4. for creating the middle boody hackle.

7. Attach a new strand of the black wool yarn 

8. Wind a frontboody. Attach and cut of the wool yarn. Its important that you leave about 3-4 mm mm free for the fronthackle and the head and the eyes.  

9. Tie in the fronthackle.

10. Attach the eyes. I varies the eyes depending if i want a flie that should sink faster, then i use the chaineyes or even dumbbell eyes. But mostly i prefer to fish this flie as light as possible, especially if i use it for fishing after seatrout from the coast. Don´t forget to secure the eyes with a drop of superglue.

11. Attach 2 strands of mirage flash. The length of them should exceed just behind the tail and the hackle.

12. Now we should finish the flie whit the head. Attach the black wool yarn just in fron of the fronthackle. Wind the thread in front of the eyes. 

13. Wind the woolyarn in figures of eight around the eyes. Attach it and cut of the woolyarn and then finish the flie with a couple of whip finish knots. Cut of and varnish.

You now have a rely good flies for chasing seatrout.